|
Amazon Web Services S3 Bucket Backup
|
|
|
Save your Adjix links to your own Amazon S3 Bucket.
Adjix allows you to automatically save all of your links, in real time, to your own S3 bucket when they are created.
Best of all, you can use your own domain name instead of adjix.com or ad.vu in your links.
If you configure your DNS server as described here then your links could look like http://go.example.com/1234 instead of http://adjix.com/1234.
Most importantly, if the Adjix servers go down for any reason, you can update your DNS CNAME (in this example, go.example.com) to point directly to your own AWS S3 bucket named go.example.com.s3.amazonaws.com, instead of partner.adjix.com, and your links will keep working!
Important Steps
You must share your AWS S3 backup bucket with Adjix and then update your Adjix account profile with the name of your bucket. When you do this, only you and Adjix will be able to write to this bucket. However, everyone will be able to read from it (i.e. click on your links). You can share your S3 bucket by configuring its access control list (ACL). One of the most popular tools, for doing this, is a free Firefox plugin called S3Fox Organizer. Simply download it and install it in Firefox.
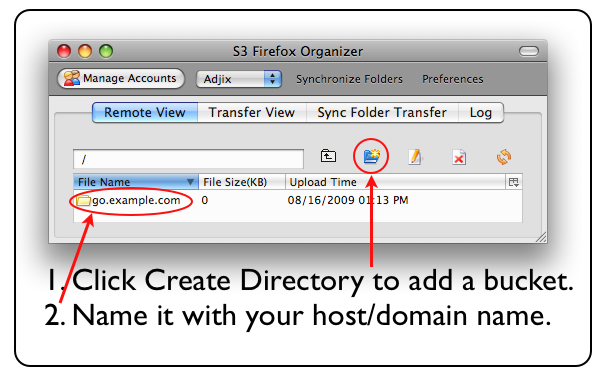
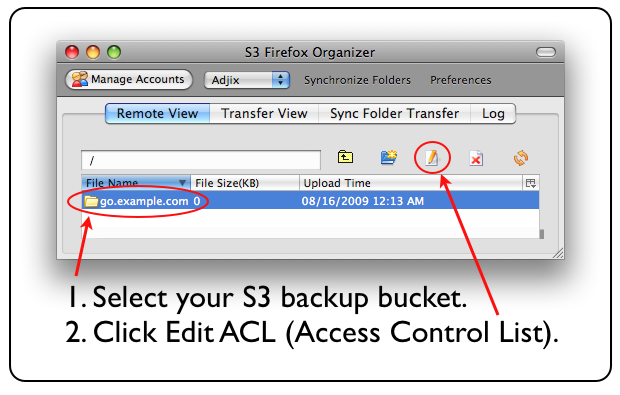
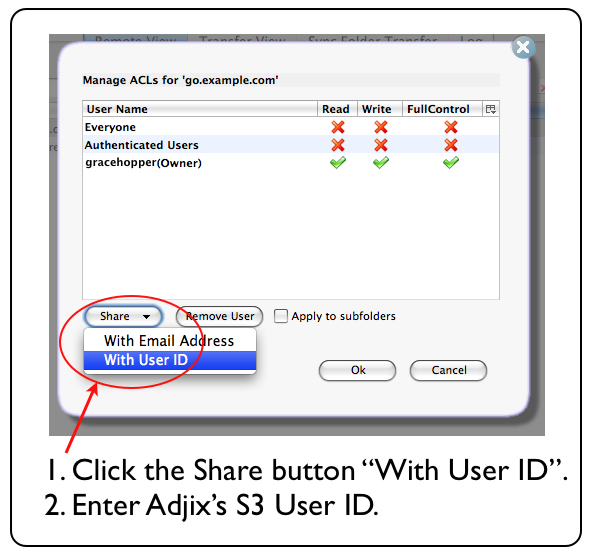
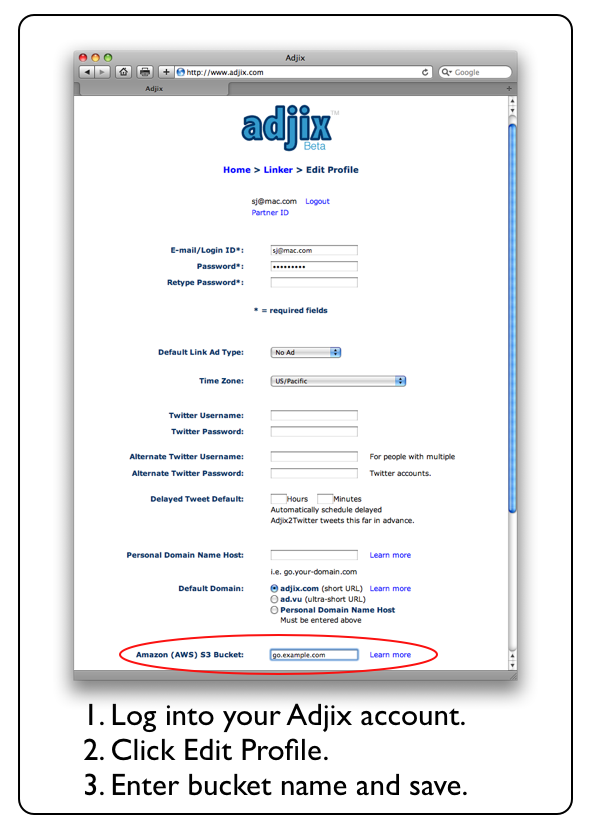
Follow these steps to create and share your AWS S3 bucket with Adjix.
Step 1 of 5: Create your AWS S3 Bucket.
Step 2 of 5: Edit the bucket's ACL.
Step 3 of 5: Share your bucket with Adjix.
Adjix S3 User ID: cc6e91f1d7176a7acf53dc00271bacfccab6217b346c021063c129f61f1cb9cf
 Adjix S3 User ID: cc6e91f1d7176a7acf53dc00271bacfccab6217b346c021063c129f61f1cb9cf
Step 4 of 5: Allow Adjix to read & write to your bucket.

Step 5 of 5: Enter your bucket name into your Adjix account.
Note:
If you set your domain's DNS CNAME to point to Adjix (partner.adjix.com) then we will track clicks stats for your links that you create with Adjix.
If you set your domain's DNS CNAME to point directly to your S3 bucket (i.e. go.example.com.s3.amazonaws.com) then Adjix cannot track your click stats.
|
|
|
|
|
|
|
|
|
|
|
|
|
|
|
|